A Crash Course in Hardware Hacking Methodology: The Ones and Zeros
Author: Nathan Keys
The Internet-of-Things (IoT) has quickly and seamlessly become woven into the fabric of our daily existence. With the influx of access and convenience came what is arguably a Wild West of insecure devices, ripe with low-hanging and complex vulnerabilities alike. Whether it’s networking hardware, medical devices, agricultural equipment, IoT/smart devices, or even access control systems, each piece of hardware presents its own set of challenges and vulnerabilities. Across all sectors, implementations continue to be uncovered that provide attackers with actionable avenues of attack. Increasingly, the need arises for security researchers to dive into this in both niche and holistic specialization.
Coinciding with the official launch of our IoT Security Assessment offering, the main intent of this blog post is to dive into the hardware penetration testing methodology we use daily. We’ll focus on the essential steps from planning and reconnaissance to networking protocol, hardware, and firmware analysis, providing you with a high-level overview of how to assess physical devices and their associated applications. These tasks are the backbone of any hardware security assessment and are requisite for a thorough, in-depth analysis of hardware and their internal systems.
Functional Evaluation & Reconnaissance
The initial phase of any hardware penetration test is arguably the most crucial, where the consultant develops a comprehensive understanding of the target device, its environment, components, and their interactions without actively trying to exploit vulnerabilities. This foundational knowledge provides insights into the existing attack surface and is integral for planning and executing the subsequent phases of the penetration test, where vulnerabilities will be actively exploited to assess their impact. The specific objectives and methods utilized generally flow as follows:
Functional Evaluation
In this first step we will begin to grasp the device’s intended use case, its features, and its role within the larger system or network by operating and observing the device in a state similar to what a normal consumer or operator would experience. This allows us to establish a baseline and understand how the device works in standard operation as well as what effect (intended or otherwise) various kinds of simulated environments may have on the device’s functions (e.g., What communication protocol is used if wireless is unavailable?). It is important to note that often, security weaknesses are rooted in poorly documented and, therefore, poorly understood features or configurations.
Information Gathering
While the initial functional evaluation is in progress, information gathering will commence. At its most basic level, this involves collecting and analyzing publicly available information. Public documentation can provide a wealth of information pertinent to the functions and attack surface prior to ever opening or interacting with the device. It is important to remember that while there are resources that we will turn to for all devices, we must be creative when attempting to effectively obtain open-source intelligence (OSINT) that might hold information vital to understanding the functions of the device as documentation will vary greatly by device and manufacturer. While not an exhaustive list, below are examples of sources used to enumerate devices:
- Searchable FCC ID Database
- Component Datasheets
- Operating Manuals
- Marketing Materials
- User Support Forums and FAQs
- Patent Filings
- API Documentation· Schematic Diagrams
Referencing discovered documentation and further Information gathering will continue throughout the assessment as we identify more components, specifically during the hardware analysis phase.
At this point, we should understand and document the basic operations and functions of the device, the communication mechanisms in use, physical ports accessible from the exterior of the device (e.g., ethernet or USB), and any identifying numbers such as the serial number and FCC ID.
Let’s briefly discuss what it is and the importance of having something like the FCC ID, for example. The FCC mandates that devices that emit radiofrequency energy and are intended to be marketed in the United States must have an FCC ID. This includes things like smartphones, Wi-Fi routers, Bluetooth speakers, and other devices that utilize wireless communications. This ID is important to the FCC because it “ensures” that these devices comply with FCC regulations. The ID is important to us because it means there are likely some publicly available & easily attainable technical details and images about the device.
Example
Here are two examples of external labels that provide a wealth of information, including their FCC IDs, model numbers, default credentials, and default SSIDs.


Using the first device shown, navigating to fccid.io and entering the FCC ID “TE7WR841NV14”, we are met with the public documentation for this device at fccid.io/TE7WR841NV14. We find that there was a request to make certain details confidential, but as shown below, we can still access images of the internal hardware and components along with technical information about wireless protocols in use. While these images may not seem like much at first glance, they hold fundamental details about internal components, debug ports and other specifications that would not otherwise be known unless the device was disassembled.

Network & Communication Analysis
In the network & communication analysis phase of a hardware penetration test, we analyze the network topology, focusing on the communication protocols, connected devices, and applications that interface with the target device. A range of tools and techniques are used to intercept and scrutinize the data exchanges between the target device, its companion application, and any associated cloud servers or services.
Network Enumeration & Wireless Analysis
Network scanning tools such as Nmap are used to enumerate open ports and services running on the target device and other connected devices within the network. This information helps in mapping the potential attack surface and identifying things like services in use that may have vulnerabilities or that are worth further investigation. Packet capture tools, such as Wireshark and tcpdump, are also used to intercept and decode the network traffic generated by the target device. This process enables us to identify the specific communication protocols used, such as MQTT, CoAP, or proprietary protocols, and assess their security implementations. Additionally, we’ll intercept traffic broadcast from radio frequency (RF) protocols like Wi-Fi, Bluetooth low energy, ZigBee, or LoRA, for example. Bluetooth low energy (BLE) is commonly seen in devices we assess and often proves to be a fruitful avenue for the exploitation and interception of data. Basically, we use the information gleaned here to determine whether sensitive information, such as user credentials or encryption keys, is being transmitted in plain text or if there are any weaknesses in the authentication or encryption mechanisms.
Backend Infrastructure & Updates
Many IoT devices frequently communicate with cloud-based infrastructure, APIs and other services to send telemetry data, receive firmware updates, or enable remote management capabilities. We identify and document these cloud hosts and analyze the data being exchanged to ensure that it is properly encrypted. One example of a common technique is intercepting over-the-air (OTA) firmware updates, which, if successful, provides us with the officially signed device firmware that can be taken offline for further enumeration and/or malicious manipulation. Examples would include, but are not limited to, the insertion of malicious code and pushing the firmware to the device via the update mechanism, discovering hardcoded keys and credentials, and other generally sensitive information that would be otherwise inaccessible.
Mobile & Web Applications
Lastly, we’ll investigate the target device’s companion mobile and web applications, as these applications often serve as the primary user interface for controlling and monitoring the device. By intercepting the communication between the application and the device as well as reverse engineering the mobile application for static and dynamic analysis, we can pinpoint any vulnerabilities in the application’s authentication, authorization, or data handling mechanisms that could be exploited to compromise the target device, associated user accounts, or backend systems. Reverse engineering of a mobile application allows us to correlate the various values identified during the analysis of BLE communications (or other protocols) to their actual purpose or meaning in relation to device functionality and data collection.
Example
Let’s use BLE as an example and briefly discuss this protocol. Unencrypted communications and the lack of a secure authenticated pairing process are prolific across BLE implementations and have various levels of impact. The three most common types of attacks against BLE are identity tracking, passive eavesdropping (sniffing), and active eavesdropping (machine-in-the-middle or MITM). To expand a little further, identity tracking exploits the Bluetooth address to track a device, passive eavesdropping allows for us to listen to data being transmitted between devices, and active eavesdropping or Machine-in-the-Middle (MiTM) allows us to impersonate a legitimate device to coerce another device into connecting to the malicious device. There are solutions to protect against these attacks, but they also come with specific challenges–from user interaction and ease of use to complexity in implementation–that are out of the scope of this post. It’s worth noting that Bluetooth LE defines 4 security levels in security mode:
- Level 1: No security (no authentication and no encryption).
- Level 2: Encryption with unauthenticated pairing.
- Level 3: Authenticated pairing with encryption.
- Level 4: Authenticated LE Secure Connections pairing with encryption.
Each connection starts at security level 1 and is then upgraded to a higher security level depending on which pairing method is used. The pairing methods are as follows:
- Just Works: Both peers generate the short-term key (STK) based on the information exchanged in plain text, and the user is asked to accept the connection. (unauthenticated)
- Passkey Entry: A 6-digit number is displayed on one device and needs to be typed in on the other device. The I/O capabilities of the devices determine which one displays the number and which one inputs it.
- Out of Band (OOB): The encryption keys are exchanged using a method other than Bluetooth LE, for example by using NFC.
- Numeric Comparison (LE Secure Connections only): Both devices display a 6-digit number, and the user selects “yes” or “no” to confirm the display.
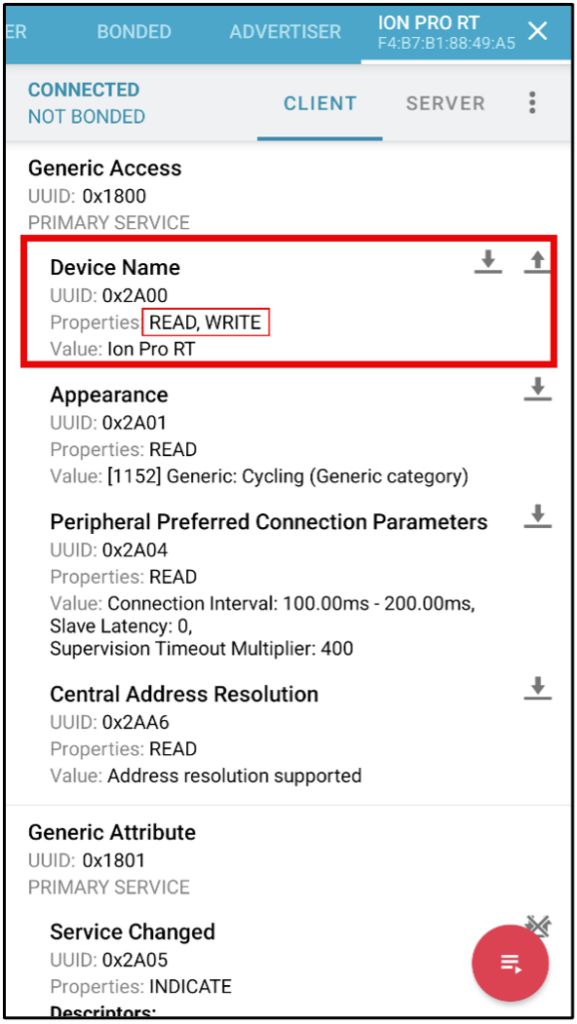
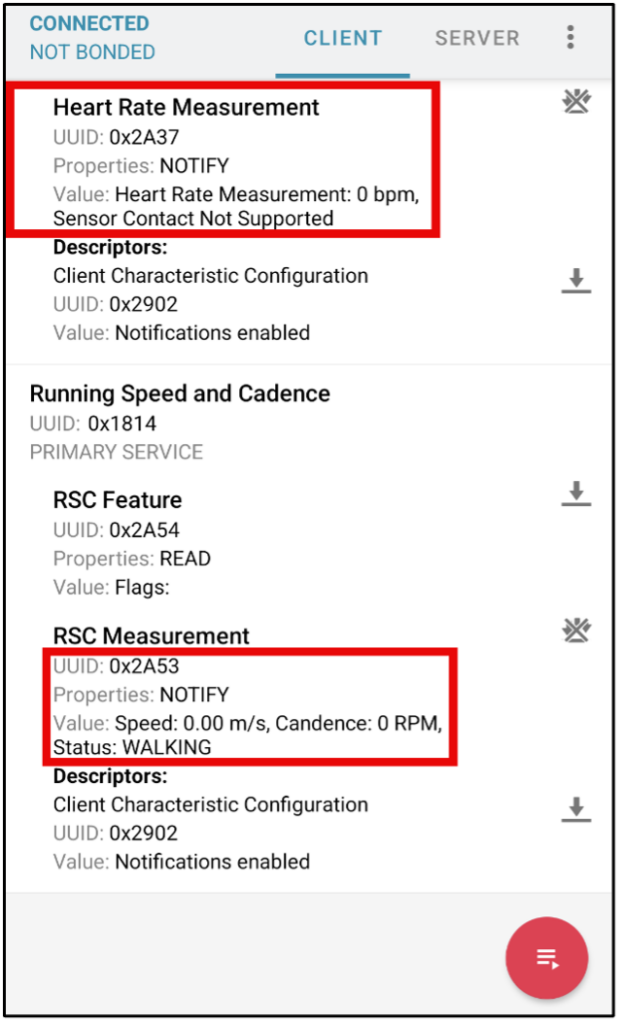
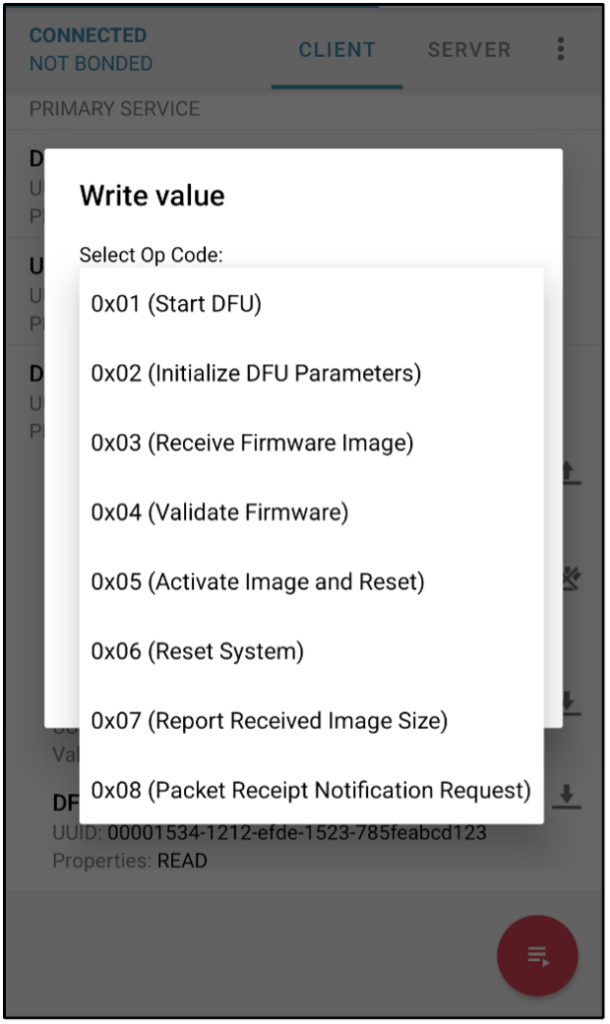
Below is an example of what we might encounter during an analysis of BLE. We can connect to the device from an unauthenticated perspective, enumerate available services, and alter values associated with these services. Sometimes, we won’t know exactly what these do unless we are able to reverse engineer an associated mobile application, and other times, it will be very clear what function the services are associated with, e.g., heart rate, temperature, and various other metrics. To enumerate these devices, we have chosen to use the nRF52840 dongle and the nRF connect mobile app.
In these images are three separate devices, all of which have been connected to using an unauthenticated perspective, as mentioned above. When assessing the first device, we immediately notice that it is possible to change the name of the device to anything we choose. While the impact here may be low, this can cause the device to broadcast a name not assigned to the device by the owner and potentially cause a connection to a malicious device with the name assigned to the device at the factory or by the owner. The second device broadcasts heart rate and speed of movement in a manner that allows anyone looking to see these details. Finally, the third device has what is arguably the most impactful vulnerability. Anyone can connect to this device and initiate various states of operation, such as the firmware update mode and reset. This sort of functionality should absolutely be restricted to authenticated users or applications.


Hardware Analysis
External and internal physical components are the primary targets for analysis and documentation during the hardware analysis phase of the assessment. We’ll refer to previous notes and images from our visual inspection of the IoT device’s exterior, noting any external ports, connectors, or interfaces that would be useful while inspecting the device’s internal components. It is important that we are mindful and look for any signs of tampering or physical security measures, such as anti-tamper mechanisms or secure enclosures. These will be documented and ultimately noted as strengths when completing the final report.
Device Disassembly
After carefully disassembling the device, we methodically document observations to ensure that the device can be accurately portrayed during reporting, and so that it may be reassembled correctly after the assessment. Once the device is disassembled, we’ll identify and analyze the various hardware components, such as processors, memory chips, storage devices, and communication modules. There are numerous tools that can and will be used during analysis depending on the situation. Some of these devices include multimeters, logic analyzers, and oscilloscopes to probe and test the device. Debug ports such as UART, JTAG, or SWD are prime targets and can potentially be used to access the device’s firmware or execute arbitrary code. Along with debug ports, we’ll attempt to access the device’s storage media, such as flash memory or EEPROM, to determine whether sensitive data can be extracted or modified.
Printed Circuit Board (PCB) & Chip Inspection Basic Workflow
There are many approaches one can take for hardware assessments and the workflow can change depending on the device and scenario in general. There are many more advanced techniques used during this process that will not be discussed here and it’s highly recommended to research the further depth and complexity of this phase. That said, the following list should provide a solid starting point for practice and research:
- Identify and document any interfaces that you suspect to be debug ports, including JTAG, UART, SWD, I2C, ethernet, etc.
- Document and perform OSINT (datasheets) on any integrated circuits (IC) with a focus on microcontrollers and memory (EEROMS).
- Observe the physical location of components on the circuit board. Related components are often grouped together, which provides greater insights into their purpose.
- Record the voltages found on the suspected debug interfaces using a multimeter. For example, ground vias/pins can often be identified with continuity testing. Similarly, receive (RX) and transmit (TX) pins can sometimes be discovered by obtaining voltage and resistance values.
- Once grounds and voltages are identified, we can use a logic analyzer to perform further analysis of the interface and potentially determine its function.
- Attempt connection to debug interfaces and determine if debug functionality has not been disabled on the device. If enabled and you have access to the device, perform further research and analysis to understand potential attack vectors, such as modifying data in memory and exfiltrating data (firmware, secrets, etc.).
- Attempt to read data stored in memory and further check if the memory chips or microcontrollers in place have protections to prevent this type of access.
- There are many other tools that can and should be used that will facilitate ease of enumeration. Some of these include the Bus Pirate, JTAGulator, CH341A programmer, Segger J-Link, Attify Badge, Tigard, STlink and many more. Along with personal preference, it is highly dependent on the device which tooling will be deployed.
After performing these steps, we should have a solid understanding of the functionality, components, and attack surface of the target device. Industry standards and best practices such as the OWASP IoT project and NIST Cybersecurity for IoT Program emphasize the importance of hardware security testing in device assessments. This phase should align with these or similar guidelines, providing a structured approach to identify and address hardware-level vulnerabilities.
Example
The images below provide examples and illustrate the diversity of PCBs, interfaces, and chips that one might observe during analysis. The first three images are examples of potential debug interfaces, both with/without header pins and filled/empty vias. In the third image, we can clearly see it labeled as an SWD interface. Sometimes you’ll get lucky and find that there are obvious labels like SWD and UART or even RX and TX to designate the send and receive pins.


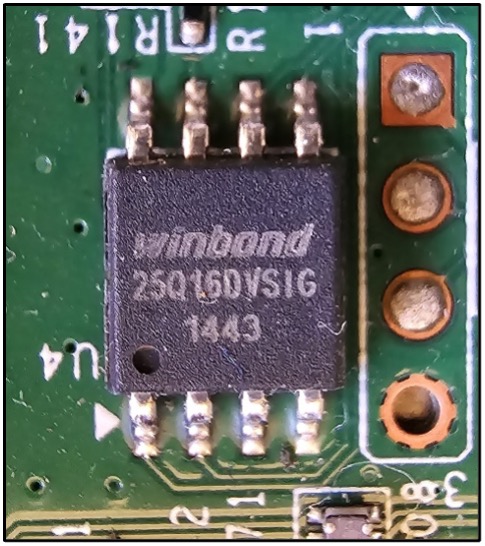
The next three images outline integrated circuits (ICs) that we’d both perform OSINT against (looking for datasheets and other information) and attempt to enumerate. These are potential memory (EEPROMs) that could hold firmware or other potentially sensitive information. Determining if these chips will allow us to write persistent data to memory is of equal importance.


Firmware Analysis
If we manage to obtain the firmware of the device via extraction from memory (SPI), debug interface (JTAG), or OTA update, analysis of the firmware will take place. This, like each step before, can have its own depth and set of complexities. Firmware refers to the low-level software that is embedded into the hardware of the device, controlling things like its functionality, communication and security features. During this phase, a combination of static and dynamic analysis allows us to understand the firmware’s structure, functionality, and potential weaknesses without necessarily executing on the device itself.
Unpacking and decompiling (Static Analysis)
Once the firmware is obtained, generally the first step is unpacking, which deals with extracting the firmware components from proprietary or compressed file formats. Binwalk, a firmware analysis tool, should be used to identify and extract firmware components, such as compressed files, filesystems, and executable code. If extraction went well, we could analyze the firmware’s filesystem, which can reveal tons of valuable information such as configuration files, scripts, hardcoded credentials, keys, and much more.
Very often, we’ll employ disassemblers and decompilers, such as IDA Pro, Ghidra, Binary Ninja or Radare2, to convert the firmware’s binary code into assembly or even programming languages like C. During this type of analysis, we will not only search for sensitive data (credentials, keys, etc.) but also for vulnerabilities in the code itself.
Dynamic Analysis
Dynamic analysis involves executing the firmware in a controlled environment, such as an emulator (QEMU), to observe its runtime behavior and interactions with various components. Typically this approach provides insights that may not be apparent through static analysis alone, such as memory corruption bugs, input validation issues, and/or insecure communication channels.
Vulnerabilities and Automated Tooling
Let’s look at the OWASP Internet-of-Things Top 10 vulnerabilities, many of which are related to a device’s firmware. These should give us a good base of focus areas during our analysis:
- Weak, guessable, or hardcoded passwords
- Insecure network services
- Insecure Ecosystem interfaces
- Lack of a secure update mechanism
- Use of insecure or outdated components
- Insufficient privacy protection
- Insecure data transfer and storage
- Lack of device management
- Insecure default settings
- Lack of physical hardening
There are various automated tools that will assist in enumeration and analysis of firmware. Some examples would include Firmadyne, FACT, OFRAK, Firmwalker, EMBA, and more. These tools will have varying feature sets but in general they will identify binaries and their versions, hardcoded strings of value, services in use, and various other details related to the top vulnerabilities listed above. It’s important to note that while automated analysis is convenient, there is immense value to understanding the manual process that validates and achieves the same result.
Example
Let’s review a simple example using Binwalk to extract a filesystem from a device and enumerate that filesystem looking for sensitive information. We’ll first run Binwalk to view what it can see within the bin file (firmware) prior to extracting. In this case, we are specifically looking at the Squashfs filesystem.
┌──(keys㉿gps)-[~/Desktop]└─$ binwalk tplink.bin

DECIMAL       HEXADECIMAL     DESCRIPTION
--------------------------------------------------------------------------------
53536         0xD120          U-Boot version string, "U-Boot 1.1.3 (Feb  3 2021 - 10:10:08)"
66048         0x10200         LZMA compressed data, properties: 0x5D, dictionary size: 8388608 bytes, uncompressed size: 2986732 bytes
1048576       0x100000        Squashfs filesystem, little endian, version 4.0, compression:xz, size: 3009464 bytes, 553 inodes, blocksize: 262144 bytes, created: 2021-02-03 02:21:45
Below we extract the contents of the firmware and can not only view the filesystem but enumerate, modify and exfiltrate any file within. As we enumerate the file system, we’ll often begin by exploring the available binaries and their functions as well as looking for other sensitive values.
┌──(keys㉿gps)-[~/Desktop]└─$ binwalk -e tplink.bin

DECIMAL       HEXADECIMAL     DESCRIPTION
--------------------------------------------------------------------------------
53536         0xD120          U-Boot version string, "U-Boot 1.1.3 (Feb  3 2021 - 10:10:08)"
66048         0x10200         LZMA compressed data, properties: 0x5D, dictionary size: 8388608 bytes, uncompressed size: 2986732 bytes
1048576       0x100000        Squashfs filesystem, little endian, version 4.0, compression:xz, size: 3009464 bytes, 553 inodes, blocksize: 262144 bytes, created: 2021-02-03 02:21:45

┌──(keys㉿gps)-[~/Desktop/_tplink.bin.extracted]└─$ ls
100000.squashfs  10200  10200.7z  squashfs-root  squashfs-root-0

┌──(keys㉿gps)-[~/Desktop/_tplink.bin.extracted]└─$ cd squashfs-root

┌──(keys㉿gps)-[~/Desktop/_tplink.bin.extracted/squashfs-root]└─$ ls
bin  dev  etc  lib  linuxrc  mnt  proc  sbin  sys  usr  var  web

┌──(keys㉿gps)-[~/Desktop/_tplink.bin.extracted/squashfs-root/bin]└─$ ls
ash      cat    cp    df    kill   ls     mount    pidof  ping6  rm  sleep
busybox  chmod  date  echo  login  mkdir  netstat  ping   ps     sh  umoun


┌──(keys㉿gps)-[~/Desktop/_tplink.bin.extracted/squashfs-root]└─$ cd etc

┌──(keys㉿gps)-[~/Desktop/_tplink.bin.extracted/squashfs-root/etc]└─$ ls
MT7628_AP_2T2R-4L_V15.BIN   SingleSKU_FCC.dat   fstab   inittab        passwd.bak              resolv.conf
MT7628_EEPROM_20140317.bin  TZ                  group   iptables-stop  ppp                     samba
RT2860AP.dat                default_config.xml  init.d  passwd         reduced_data_model.xml  services

┌──(keys㉿gps)-[~/Desktop/_tplink.bin.extracted/squashfs-root/etc]└─$ cat passwd.bak
admin:$1$$iC.dUsGpxNNJGeOm1dFio/:0:0:root:/:/bin/sh
dropbear:x:500:500:dropbear:/var/dropbear:/bin/sh
nobody:*:0:0:nobody:/:/bin/sh
Conclusion
In this post, we have explored the essential phases of hardware hacking methodology for assessing and securing IoT devices and embedded systems. From functional evaluation and reconnaissance to network mapping, hardware assessment, and firmware analysis, each phase plays a crucial role in identifying vulnerabilities and potential attack vectors. Throughout the process, we will have documented our findings, including the identified vulnerabilities, their potential impact, and recommended remediation strategies. This information translates to a comprehensive security assessment report, which aims to assist device manufacturers and users in understanding and addressing the identified risks. As our embedded world continues to evolve, it is essential to stay vigilant, adapt our methodologies, and collaborate to create a safer and more resilient connected world. After all, hardware hacking is a journey into the heart of our devices, where the ones and zeros hold the key to fortifying their security and ensuring a protected future for the Internet of Things.